Taste the rainbow
We had Peanut's sixth birthday party on Friday. Ten little girls in princess outfits.
Last year, I made an elaborate castle cake. It took two days.
When Peanut told me she wanted a princess tea party again, I cringed.
Fine, but let's talk about different cake ideas, I told her.
Some friends of mine had recently posted photos of something called a Rainbow Cake on Facebook, and it sounded relatively easy, and given I can barely find time to clip my own fingernails, easy it was!
1. Make your cake batter.
I like Arrowhead Mills Organic because there's no trans fat in it.
(Believe it or not, both Betty Crocker and Duncan Hines mixes contain partially hydrogenated oils. Why these things need to be in a dry cake mix, I have no idea, but they are and they're HORRIBLE for you. It's worth it to pay the extra for organic, or if you're even more ambitious, make your mix from scratch).
I used two boxes of cake mix for this cake.
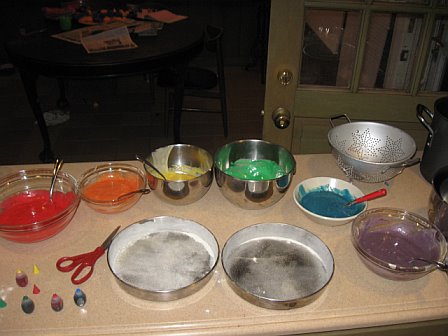
2. Divide the batter, a cup at a time, into however many colors you want your "rainbow" cake to be. I used six. Put a little extra in the first and last colors - maybe a quarter cup or so.

Then use food coloring to dye each bowl a different color.
3. Scoop the batter, a cup at a time, into the pans.
OK, here's the slightly tricky part. Use a one-cup measuring cup and scoop out a goodly amount from the first bowl. Pour it directly in the center of your cake pan. Because this is the first color and has to "spread" the most, add about a quarter cup more.
Rinse the measuring cup and do the same thing for each color, pouring each new color on top of the previous ones in concentric circles like this:

4. Bake per directions.
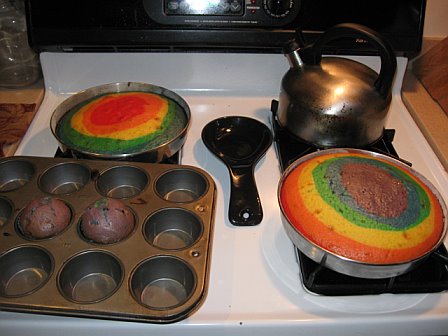
The two layers, about to go into the oven.

As you can see, I did the second layer in reverse order (purple on the outside and red in the center, but that's up to you).
(Mark called it a "Willy Wonka Cake." I think he's not far off.)
5. Let cake cool.
Finished cakes. I had a teeny bit of extra batter, so I did two cupcakes too.

6. Frost or decorate.
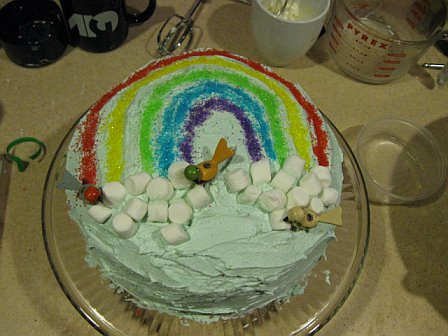
I used light blue icing (like the sky), colored sugar in rings and mini (all natural) marshmallows for clouds. The little birds are candle holders Mark had when he was a babe. Cute, aren't they?

7. Enjoy!
Birthday girl blowing out the candles:

Inside of the cake once sliced. Groovy, dude!

Last year, I made an elaborate castle cake. It took two days.
When Peanut told me she wanted a princess tea party again, I cringed.
Fine, but let's talk about different cake ideas, I told her.
Some friends of mine had recently posted photos of something called a Rainbow Cake on Facebook, and it sounded relatively easy, and given I can barely find time to clip my own fingernails, easy it was!
1. Make your cake batter.
I like Arrowhead Mills Organic because there's no trans fat in it.
(Believe it or not, both Betty Crocker and Duncan Hines mixes contain partially hydrogenated oils. Why these things need to be in a dry cake mix, I have no idea, but they are and they're HORRIBLE for you. It's worth it to pay the extra for organic, or if you're even more ambitious, make your mix from scratch).
I used two boxes of cake mix for this cake.
2. Divide the batter, a cup at a time, into however many colors you want your "rainbow" cake to be. I used six. Put a little extra in the first and last colors - maybe a quarter cup or so.

Then use food coloring to dye each bowl a different color.
3. Scoop the batter, a cup at a time, into the pans.
OK, here's the slightly tricky part. Use a one-cup measuring cup and scoop out a goodly amount from the first bowl. Pour it directly in the center of your cake pan. Because this is the first color and has to "spread" the most, add about a quarter cup more.
Rinse the measuring cup and do the same thing for each color, pouring each new color on top of the previous ones in concentric circles like this:

4. Bake per directions.
The two layers, about to go into the oven.

As you can see, I did the second layer in reverse order (purple on the outside and red in the center, but that's up to you).
(Mark called it a "Willy Wonka Cake." I think he's not far off.)
5. Let cake cool.
Finished cakes. I had a teeny bit of extra batter, so I did two cupcakes too.

6. Frost or decorate.
I used light blue icing (like the sky), colored sugar in rings and mini (all natural) marshmallows for clouds. The little birds are candle holders Mark had when he was a babe. Cute, aren't they?

7. Enjoy!
Birthday girl blowing out the candles:

Inside of the cake once sliced. Groovy, dude!


10 Comments:
What a great cake!
I'd seen another article on "rainbow cake" that involved making a separate (small) flat cake of each color and then stacking them, so when you said "easy," I was seriously wondering. This one WAS easy! I like it.
Oh, I like that!
I can't believe that actually works! Very cool.
Karen would love that cake! She loves most things rainbow LOL
I was going to do the castle cake for Maya in 2 weeks and now I like this one better! Its looks awesome!
That is the coolest cake! I love the colors, and the idea of marshmallows for clouds. I bet it was a hit!
That is so very, very cool. You rock!
cute cake! It's so groovy!
Hey, I didn't know you were doing that. Glad it turned out so well!
I saw the other multi layer cake and liked it. I am having a willy wonka party for my daughter, and I love this one, easier and more whimsical!! Thanks for the post
Post a Comment
Subscribe to Post Comments [Atom]
<< Home